S'more of what!?

 
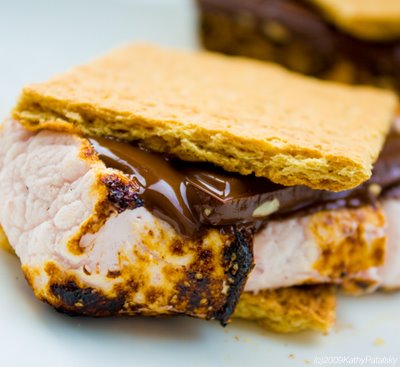
Wow, this is like the uber ultimate s'more! I definitely wouldn't want "s'more" of that...I doubt I could even manage to eat the whole thing! 

I'm sure EVERYONE has had a s'more once or twice or....multiple times (like me) in their life. It is totally the best campfire snack that is so fun to make in the summer! I've even made these in my microwave before! (No...I'm not weird! Have you ever heated up a marshmallow in the microwave and watched it from the outside!? Sooooo silly looking). 

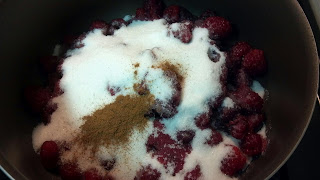
Anyways, That is just a little too much in the picture above. 

This is more like it!

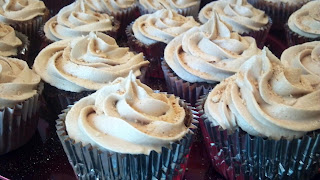
Buttttt...have you ever had a S'MORE CUPCAKE!? Chances are probably more slim...

I changed up a couple things here and made it my own concoction. I think I am getting better at that the more I bake! *Crosses Fingers* I've seen other s'mores cupcakes and a few were original...a few weren't...and I didn't want to copy ANY idea from anyone this time around. 

I decided to take my chocolate cupcake recipe that I used a while back for my boss' 60th birthday party, stir in some mini marshmallows to the batter, and add my very own special icing. I have decided that I AM NOT going to reveal my special ingredient that is featured in my "graham cracker" butter cream. After all, the main ingredients in a s'more are graham crackers, chocolate, and marshmallows...as long as I captured those 3 flavors, I figured I was good to go! 

I was a little worried about the marshmallows diving into the moist, can't-help-but-lick-the-spatula chocolate cake batter. I went ahead and dumped more than half the bag into the batter and stirred it on up. 
After baking them for about 20 minutes...well not about...for 20 minutes exactly...They were ready to be pulled out! It was a sight to see (I should have captured a picture) looking through the oven door while they were baking because the marshmallows were bubbling away! I was definitely worried that the cupcake itself wasn't going to cook all the way and the marshmallow was going to ruin the cupcakes. This wasn't the case though...After my first batch, I put a few less marshmallows into each liner and they came out perfect!
Then comes my least favorite part of baking cupcakes...having to wait for them to cool completely before icing them! I whipped up the world's most amazing "graham cracker" butter cream. No really...it is amazing...this is just regular vanilla butter cream with that special ingredient that I cannot reveal...unfortunately :) For the FEW of you that know, please keep the secret safe within you!

After adding some left over graham cracker crumbs to the tops, they were completed!

What I will change next time: Put a few less mini marshmallows in each liner...this will prevent any sticking to the liner and cause the batter to rise more over the 'mallows to leave the cupcakes less sticky and chewy on the tops. Many of mine turned out like the picture above after the first batch!

What was a little odd: The marshmallows caused the tops of the cupcakes to be a little chewy. It's very hard to explain, but I am interested to see how they are tomorrow after the icing has been sitting on top of the cupcake over night. Maybe things will change! Not necessarily a bad thing though, but next time I will definitely put less 'mallows.

What I love about these: This is one of my favorite summer time snacks turned into a CUPCAKE! The recipe can EASILY be changed around...I could do vanilla cupcakes...with chocolate chips inside...orrrrrrr....chocolate cupcakes FILLED with marshmallow creme instead of plain 'ol marshmallows...there are numerous ways to change this concoction up! That's exactly what I love about making cupcakes...I also love the fact that I put a secret ingredient into the icing, which REALLY makes it mine without a doubt :)

These cupcakes are for one of my boss' birthdays tomorrow...I hope everyone enjoys! Just an update, my vanilla extract has been sitting for a week now and it is dark...smells absolutely amazing. Can't wait to use it in about 4 weeks!

All by its lonesome!
Crumby S'mores Yummmm!!!
This vase also has purple beads in it...GO RAVENS!!! Beads match the icing :)
Until next time, Cheers!

The Best Homemade Chocolate Cupcakes on the Planet (adapted from kiwisoutback on Squidoo)

  • 3 eggs
  • 3/4 cup butter
  • 2 cups all purpose flour
  • 3/4 cup unsweetened cocoa powder
  • 1 Tablespoon vanilla extract
  • 2 cups sugar
  • 1 1/2 cups milk
  • 1 teaspoon baking soda
  • 3/4 teaspoon baking powder
  • 1/2 teaspoon salt 
  •  
  • Soften the butter at room temperature, while taking the eggs out to also warm to room temperature, approximately 20 minutes. Grease the cupcake pans, and if desired, line them with cupcake wrappers and set aside. Meanwhile, stir together the flour, cocoa powder, baking powder, baking soda, and salt in a mixing bowl, then set aside.
  • Preheat oven to 350° F. Beat the butter in a mixer on medium speed for 30 seconds. Add the eggs, then add the sugar gradually until fully combined. Scrape the sides and beat again until combined. Beat in the vanilla, adding the milk and flour on low speed. Beat on a higher speed for one minute, or until well combined and smooth.
  • Pour the batter into cupcake pan, filling each indention no more than 3/4 full.
  • Bake for 20 minutes, or until a toothpick comes out clean when inserted into the center of a cupcake. Cool for at least 15 minutes, then remove the cupcakes. Frost immediately.


Extract for Life & Raspberry Goo

I was feeling really home-y today and after picking my own fresh berries yesterday, making a more than delicious blackberry cobbler, and still having raspberries to do something with, I decided to make JAM!

While in the barn yesterday at the farm, I noticed something called Pectin. The first thing I thought of when I saw this was bees. Isn't this the stuff they feed on in flowers!? But then i remembered nectar...but I KNOW during my biology class in college, my professor mentioned something about pectin...orrrrr...I could just be having a brain fart.

Anyways, I learned that pectin is stuff that makes the jam all jammy and thick. I didn't bother getting a pouch of this at the barn. When I woke up to make the jam, I thought back to the corn starch that I used for the filling of my cobbler and how nice and thick it got from this. I immediately searched the internet for information about substituting corn starch for pectin and sure enough, this was an option!

This morning, while staring at my still-vacuumed packed vanilla beans on my counter top, I put raspberries, sugar, cinnamon, and corn starch dissolved in some water into a pot and watched it boil. This is all it takes to make homemade jam and it tastes AMAZING!

What I changed: I didn't want to use as much sugar as most recipes call for (usually a 1 cup of berries to 1 cup of sugar ratio) because it is extremely sweet. I never thought I'd hear myself saying that something was too sweet, but it definitely was. I lowered the sugar--so I ended up with almost 3 cups of raspberries and about 2 cups of sugar. I am obsessed with cinnamon so I added this as well.

I immediately poured the jam into mason jars (turned out to be about 1.5 pints of jam) and shut tight. I just tried it not too long ago and it is perfect. GO ME!!

Try new things, ya never know what you can be good at :)


Now you say...what is this extract talk I've been hearing!? Well, I decided to order a 1/2 pound of Madagascar vanilla beans on Amazon and it was probably the best decision I've made in a while. I need them for the next cupcake order in 2 weeks and heard they can keep for a while as long as you store them correctly. When I was ordering them, I also learned that you only need about 22 to make a quart of vanilla extract. What a perfect idea instead of buying a $5 tiny-ass bottle in the store!! (Pardon my french)

When I saw this though, I thought, "Hmmm...it has to be a difficult process and how in the world do you make extract!?" Here is where Google comes into play once again...

Mid-level vodka and heavenly smelling vanilla beans is ALL you need! WHAT!? Craziness! And a must-have...

Tip of the day: Use 1 oz. or about 8 beans per 1 cup of vodka. I ended up using about 3 cups of vodka so I used 24 beans. This filled an entire wine bottle. EXTRACT FO LIFE!

Click here to get some good tips of how to make your very own extract in just 5 weeks :)

The ingredients...beans and vodka! Oh and an empty, dark colored wine bottle for storing!
Madagascar Vanilla Beans!
Now we wait for at least 5 weeks and VOILA!


CHEERS MY FRIENDS!

Forget Pillsbury!

Dripping...sweat........on the fruit farm....picking raspberries and blackberries!!! That's exactly what I was doing yesterday in Woodbine, MD and what a great experience it was! Pulling up to the farm, I thought about how carefree it is out there. Actually, I'm sure it's A LOT of work but I'd love just getting away for a day and picking berries til I drop. I can't wait to go back to pick some yummy apples next month! Everyone should check out Larriland Farm.

My fingers smell like vanilla right now and I am still picking out the "caviar" from my fingernails...but that's a different story...for the following blog!

Getting back on track, After spending a few hours on the farm yesterday and splitting up the berries, I came home with 2 full quarts of blackberries and a large container of raspberries. While picking, I immediately knew I was going to come home and make a pie. Although, I am not too, too fond of making pies...so when I was lounging around last night searching for recipes and NOT wanting to go out in the rain, I came across a blackberry cobbler recipe. It turned out I had everything in my pantry so it seemed like the perfect treat to make on a gloomy night.

The smell of blackberries and cinnamon quickly filled the air as I made the filling. Corn starch also became my best friend last night (and this afternoon) and at the same time, I realized I was making homemade biscuits.

Berries in the pot! Accompanied by sugar and cinnamon.

 
After adding corn starch and water to the berries, it looked jammy and thick.


The look of this cobbler filling made me want to make homemade jam more and more by the minute. I figured it couldn't be too hard and after getting some tips, I knew that's the next project I'd tackle in the morning. But first, I had to full on tackle this sweet blackberry cobbler.

After pouring the filling into an 8 inch square pan and dotting with butter cubes, I whipped up the biscuit mixture and dropped in chunks by simply using my fingers.


This right here doesn't necessarily look way too appetizing but the smell of the hot, jammy filling took over any other sense that would even be possible at this moment. It was ready to bake!

After waiting patiently for about 35-40 minutes, my blackberry cobbler was ready to be gobbled up. NOM-NOM.

...But not before whipping up some whipped cream from the whipping cream I just so happened to have in my fridge...soon I will be making this with HOMEMADE HARD-EARNED VANILLA EXTRACT!


GET IN MY BELLLAAAAYYY.

 Blackberry Cobbler (adapted from Taste of Home)

 Ingredients

  • 3 cups fresh or frozen blackberries
  • 1 cup sugar
  • 1/4 teaspoon ground cinnamon
  • 3 tablespoons cornstarch
  • 1 cup cold water
  • 1 tablespoon butter
  • BISCUIT TOPPING:
  • 1-1/2 cups all-purpose flour
  • 1 tablespoon sugar
  • 1-1/2 teaspoons baking powder
  • 1/2 teaspoon salt
  • 1/2 cup cold butter, cubed
  • 1/2 cup 2% milk (I used skim)
  • Whipped topping or vanilla ice cream, optional (I suggest making homemade because it's SOOOOO easy :))

Directions

  • In a large saucepan, combine the blackberries, sugar and cinnamon. Cook and stir until mixture comes to a boil. Combine cornstarch and water until smooth; stir into fruit mixture. Bring to a boil; cook and stir for 2 minutes or until thickened. Pour into a greased 8-in. square baking dish. Dot with butter.
  • For topping, in a small bowl, combine the flour, sugar, baking powder and salt. Cut in butter until mixture resembles coarse crumbs. Stir in milk just until moistened. Drop by tablespoonfuls onto hot berry mixture.
  • Bake, uncovered, at 350° for 30-35 minutes or until filling is bubbly and topping is golden brown. Serve warm with whipped topping or ice cream. Yield: 9 servings.

N.E.G.S.


Never Eat the Green Stuff. 
(This is not my pie!) My mom last night said that she’s never even seen green key lime pie—but I have! And apparently, you should never eat it (say the locals in Key West). Yellow is the way to go. I wouldn’t even know how to make it green—food dye? But why ruin the natural color of freshly, hand-squeezed lime juice and thick, creamy, sweetened condensed milk!?
Everyone has been telling me that I need to start writing my own recipes. It’s true, I do need to if I want to open my own bakery; however, I first need to have a strong background of a variety of different desserts and have experience creating these treats first before I can even begin to concoct my own recipes. I need to get a good sense of what works and what doesn’t work in recipes that I choose and then switch it up—ingredients that is—to make them my OWN. I will get there in time :)
Back to the delicious key lime pie I made yesterday.
Homemade crust-check
Homemade filling with freshly squeezed limes-check
Homemade meringue-check
Nothing can get better than this!
Crust is extremely easy to make if you can find already-crushed graham crackers in your local grocery store. I stole the last box of Keebler's yesterday at Walmart! Well not stole, but you know what I mean. I have crushed my own grahams in the past when I made the lemon tart but it just doesn’t get as super-fine as it needs to be for a nice, smooth crust. Once you get the already-crushed grahams, you mix them with butter and sugar and BAM! You have a sweet crust that is baked for about 7 minutes and can be used for various pies and cheesecakes! Substitute chocolate or cinnamon grahams and you have a different flavor to switch up to now and then depending on what kind of dessert you’re making.
Next came the pie filling. Super easy—3 egg yolks, a can of sweetened condensed milk, lime zest, freshly squeezed lime juice from about 5 limes, and some heavy cream. The hardest part was squeezing the limes. It took about 4.5-5 limes to get just a tad over ½ cup (I like it a little sourer) and my hand sure did hurt after this! To zest the lime, I used a hand, cheese grater (click there if you don't know what I am talking about). You simply pour the mixture over the crust and bake for 30 minutes or until stiff. 
  

While the pie is baking, I whipped up the meringue so that it was ready to be spooned on top of the hot pie filling. I was a little worried about the meringue because it was my first time making it and I didn’t want it to spread out or flatten in any way—I didn’t know what to expect.
The meringue is a piece of cake--4 egg whites (3 were left over from the pie filling and I used 1 ounce of egg white from the carton that was leftover from my angel food cake), white sugar, corn starch, and a pinch of salt. Everything is whipped up until the egg whites form soft peaks and then spooned over top of the hot pie filling. Since I don’t have a torch, I put the whole sucker back in the oven for about 10 minutes.
Beginning of the dollop-ing!
What I will use next time: Actual Key Limes! I didn’t particularly look for these while I was in Walmart and instead, just spotted regular limes and went with those. Apparently key limes are little smaller and more sour. Perfect for key lime pie!
Other than that, everything turned out FANTASTIC! The pie had just the right amount of tartness, the meringue was the perfect consistency and didn’t flatten in any way, and the crust wasn’t too thick or thin. The recipe that I used suggested that you serve the pie warm or at room temp; however, this did not work for me. I’ve always had key lime pie cold first off, and second off, the pie fell apart when I tried to cut it when it was warm. Later on, I cut it after it had been refrigerated and it was perfect. 
YUMMO! (As my mother would say)
Finished! golden tips and yellow pie!
 
 I have Key Lime Pie left over so sad face, go away!


Take your own jab at the recipe here. You won't fail it...it won't fail you...either way you wanna look at it...hmmm...think about it. 

Cheers!!