Frozen Thinga-Ma-Bobbers From Last Sunday

Did I say how DELICIOUS, scrumptious, flavorful, delectable, fantastic, and just sooo not-in-the-diet these made up things were?!

NOW I DID!

The recipe that I literally threw together on Sunday out of boredom was a pure success. We already ALL know that peanut butter and chocolate are pretty much married to one another. When you add some white chocolate in there (which I'm not usually a huge fan of) and cinnamon struesel, it becomes a crunchy, rich, and perfect little sized treat!

I placed them in a container with a lid, wrapped foil around the whole container, and stuck them in the freezer on Sunday. I almost forgot about them until tonight! But who cares!? That's what the freezer is for! Well...we can say that about some things...I wouldn't recommend keeping these in the freezer much longer than a week because they may get freezer burned.

Anyways...I was trying to find something healthy to make for dinner tonight.

Liv cooking? WHAT? That's like hearing a cat bark. Wait what?

I had some frozen veggies in the freezer and I am trying out this "slow-carb" diet type deal where you only eat good carbs. Check it out! It's sort of interesting...I ended up cheating tonight by eating quinoa--the single most healthy grain and ultimate super food that has all your nutrients for the day. How is this not allowed on this diet? Who knows...but it's awesome.

When I was grabbing the green beans, I spotted my random treats from Sunday! I pulled one out to thaw while I cooked and ate my dinner and by the time I went to snatch it off the counter, it was the perfect temp!

I only ate half of this. My Fitness Pal told me that I had a good amount of calories left over after dinner for dessert, but I didn't want to eat the whole treat PLUS a Skinny Cow caramel truffle bar

I stood over the trash can taking bite after bite of the random, frozen, thinga-ma-bobber and chucked it in the trash after four bites. That sounds like the whole cupcake liner doesn't it!? Well I can tell ya it wasn't.

I then had my Skinny Cow caramel truffle bar.

I highly recommend freezing those things if ya make them! Check out the blog right below this one to find the recipe!

Cheers!!


Around the House

I want to get more into just throwing things together around my house to make a scrumptious treat.

This is exactly what I did Sunday!

Well...I didn't THROW just ANYTHING together.

But flavors that I know will taste delicious together all went into this random baking session of mine Sunday afternoon before heading over my parents for dinner.

I REALLY wanted to make low-fat white chocolate, chocolate puddin' pies but I didn't have enough milk. These would have consisted of using Truvia instead of sugar to sweeten, nonfat milk, unsweetened baking chocolate, some white chocolate morsels, and nonfat, sugar-free, whipped cream with a frozen raspberry on top. There would have been a graham cracker crust made with Truvia on the bottom of each mini pie too!

Sounds yummy huh!?

This will be put on the back burner until March probably when I don't have every weekend occupied with exciting things to do and bake!

Anyways...back to what I ACTUALLY made on Sunday.

I layered cinnamon streusel, peanut butter, semi-sweet chocolate chips, white chocolate chips, more streusel, and topped each cupcake thinga-ma-bobber with frozen raspberries.

Random enough for ya??

I layered the ingredients in cupcake liners and baked them for about 12 minutes on 350. Added the frozen raspberries after letting them cool for a bit.

Where are they now? In the freezer! I thought this would be a great frozen treat which I will be devouring tonight most likely.

Next time...I plan to add a dollop of homemade vanilla whipped cream and THEN the raspberries on top. I just didn't have any whipping cream to do so Sunday.

I tried one when it was still warm and the flavors compliment each other so well. We'll see how good it is frozen tonight!

"Everything Cupcake Thinga-Ma-Bobbers"

To make six

1/4 c. butter softened
1/4 c. granulated sugar
1/4 c. light brown sugar
1/3 c. unbleached, all purpose flour
1 tsp. cinnamon (sometimes I like extra)
About 6 tbsp. peanut butter (I used all natural PB)
Semi-sweet chocolate chips
White chocolate chips
Homemade whipped cream and frozen raspberries (optional)

Directions:
1. Using a hand blender, beat the butter in a medium sized mixing bowl until fluffy
2. Add the sugar and brown sugar and blend well
3. Mix in the flour (slowly so it doesn't go everywhere!) and the cinnamon
4. Line a cupcake pan with six cupcake liners of your choice
5. Place a heaping tbsp of streusel into each liner. On top of that, about a tbsp. of peanut butter
6. Add a handful of each semi-sweet chocolate chips and then white chocolate chips
7. Completely cover each one with streusel again. You may have some left over in the bowl (I did)
8. Bake on 350 for 10-12 minutes
9. Let cool completely before topping with whipped cream/frozen or fresh raspberries (I only had frozen at the time but fresh would be ten times better!)

You could probably leave the toppings off, heat them before serving, and then top with the whipped cream/raspberries. Like a warm, gooey, to-die-for mini pie! I will let ya'll know how they are frozen when I eat one tonight!!

Cheers!


Bridal Show Order-Eight Dozen Minis

Current Mood: Confident
Current Song: TLC-Scrubs

So, if all went well at the bridal show today at Maryvale Prep School, my eight dozen minis were a success! I am very happy with the way they turned out last night.

The boyfriend's mom is the manager at Peerce's Plantation--a very tasty restaurant not too far from my house--and participates/caters events often. It turned out that there was an upcoming bridal show that she needed to order cupcakes for. They usually deal exclusively with this one bakery in Catonsville, however, they do not sell mini cupcakes. This is where I come in.

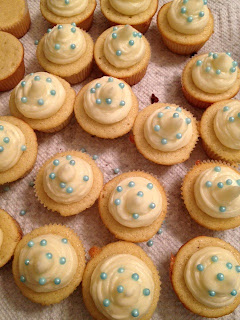
Kelly decided to order from Liv's Bakery since she wanted some minis for the bridal show! The best part about it was, she left it up to me to decide on what flavor to make. The only request was white icing with something light blue on top. Piece of cake! I knew exactly what I was going to look for at Michael's Craft Store. Light blue pearl sugar sprinkles to decorate the vanilla butter cream. And I got exactly what I was looking for :)

I decided to do four dozen chocolate and four dozen vanilla bean. For some reason, I don't really make chocolate cupcakes that often (it's a popular, generic flavor right!?) so I wasn't sure which recipe I wanted to use. I found a VERY simple chocolate cupcake recipe on cooks.com. I started reading the reviews and everyone seemed to LOVE these gosh darn chocolate cupcakes. The recipe was really general so I changed the directions as well.

I made them my own by...adding some vanilla extract, reduced the sugar since it seemed like a lot, used apple cider vinegar instead of regular, and used milk instead of water. Next time when using this recipe, I plan to add some melted semi-sweet chocolate chips or Baker's chocolate squares to increase the chocolate flavor. It was enough, but could have been more chocolatey for those die hard cocoa fans!!

What I liked about the chocolate recipe: It incorporated oil which I've discovered makes cupcakes as moist as they can possibly be. This recipe also DOES NOT use eggs or butter. Amazing how they turned out impeccable without these things!! The vinegar is a preservative and keeps them from drying out (otherwise, this is why you use eggs) and the oil makes for a hell of a great substitute for butter.

I used my all time favorite vanilla bean cupcake recipe...the "Ultimate Vanilla Cupcake" recipe which are cupcakes that end up so light and airy it almost makes you think nothing is in the mini cupcake liner. The presence of air bubbles after baking lets you know they are not too dense and that you didn't over mix the batter before baking. Success #2!!

The most time consuming part of this journey...was adding the blue pearls on top of the icing. Make sure to do this while the icing is still soft...butter cream tends to harden up real quickly. The whole order took me about three hours to complete but would have been done in two had this part not taken so long. It's all about making the order look pretty though and I was successful in that part I think!

I can't wait to hear the feedback from Kelly and Megan after the bridal show!

Random fact of the day: If you decide to make a butter cream recipe for your cupcakes/cake that doesn't include confectioner's sugar, it won't harden up. I've tried a different butter cream icing that used egg whites and granulated sugar and it is absolutely amazing (recipe in one of my recent blog posts) and it does not harden. I prefer using traditional butter cream with confectioner's sugar because they are less likely to get ruined when transporting my orders.

Next up in February: A Super Bowl order for Mrs. Jo...vanilla bean and s'mores cupcakes with black & purple butter cream! Then a baby shower order for Cassandra...vanilla bean cupcakes with whipped cream and fruit. Then 200 mini red velvet cupcakes for Valentine's Day at Peerce's Plantation. Busy month for sure!!

Cheers!


"Cinnamon Swirl Latte" Ready to Sell!!

So pumped right now!!

The 4th time making my original cupcake recipe and it is finally ready to add to my menu to sell!!

What happens when I'm bored after work and it's so freezing out that I can't even think about going to the gym?? BAKE! What else!?

I had the most excellent idea pop into my head that night as I thought about how I could positively change my cupcake recipe. I already knew I had to add oil to the recipe and take out the sour cream. The best vanilla cupcake recipe that I have made for a past order is "The Ultimate Vanilla Cupcake" which uses butter, oil, and sour cream. It comes out SO moist and amazing--when I took the left overs to the beach with me, my family loved them and they were already like 2 or 3 days old! I am now a strong believer that oil works best in cupcake recipes to make them moist.

What I changed this time around: I actually doubled my recipe. Since it was in testing mode over the past few months, I was only making six cupcakes. I was extremely excited and confident this time around, so I doubled it to make 12 (as much as a standard cupcake recipe usually yields).

I also decided to use more coffee grinds--I used 1.5 tbsp. this time as I only used 1/2 a tbsp. before (doubled would be 1 tbsp. but once again, I thought it needed more coffee flavor).

I reduced the sugar a bit as I was planning on adding a cinnamon swirl to each cupcake. The cinnamon swirl recipe includes a 1/3 cup of brown sugar so I didn't want the batter to be overly sweet.

Fill half of mixture and then add the cinnamon swirl
I did a few more minor tweaks here and there and was VERY confident after I tasted the batter of the cupcakes. I decided to name my very own recipe "Cinnamon Swirl Latte" and this name accurately portrays what this cupcake is all about! The cinnamon swirl resembles what is inside of a coffee cake and the coffee grinds make this cupcake different from any other cupcake out there!

What I used for icing: I used a regular vanilla butter cream frosting for these cupcakes. I know it would taste great with homemade whipped cream just like a real latte, however, I didn't have any whipping cream at home at the time. I am a little nervous about frosting with whipped cream when I get an order of these cupcakes though so I think I will stick with the butter cream and sprinkle of cinnamon on top!

This cupcake is ready to sell!! My coworkers and friends LOVED them--especially the coffee grinds!

The boyfriend recommended making a mocha espresso cupcake too. For this, I would use extra strong coffee grinds, maybe some freshly brewed coffee, and Baker's semi sweet baking squares! I could easily alter my recipe for this one :)

Random thought of the day: Flavored liquor would work well in coffee/chocolate/richly flavored cupcakes like these. Creamy/milky liquors (like Rum Chata) may also add moisture to the cupcakes. Trying next time around!

Cheers!!


"Alcohol is Bad in Baked Goods" Said No One EVER

GO RAY-VENS!!!!

Mood: VERY sleepy yet hopeful
Current song playing: Flo Rida--Wild Ones (feat. Sia)

First time making alcohol infused cupcakes was indeed a successful one! You may have noticed my mood--sleepy yet hopeful--the Ravens paired with Moscato, a shot of weird purple vodka, and a few Natty Bohs definitely wore me out last night. Having to work today did not help the situation either. However, my Rum Chata cupcakes were da bomb and I wouldn't change a moment of last night.

The hopeful part.

Liv's Bakery is finally heading in the positive direction! A HUGE thanks goes out to the boyfriend's mom for giving me a chance and ordering eight dozen mini cupcakes for this weekend's bridal show at Peerce's Plantation! I can't be any happier! Jumping in head first and bringing my feet off the ground. Thanks Mrs. Kelly! Four dozen chocolate and four dozen vanilla bean are planned for Friday evening. Topping them off with traditional butter cream and hopefully finding some light blue sprinkles/toppers for each (the bridal shower colors are white and light blue for a winter wonderland touch). Keeping busy!

Hopeful part, part dos.

Ravens--please win the Super Bowl not only for 52 but for your home town. We love you boys!

Back to my Rum Chata mini cupcakes with Hot Damn butter cream.

That's right. Yesterday's treat for the playoff game were these scrumptious, bite size cupcakes for alcoholics. Just kidding. Alcohol disappears once baked, right!?!? :)

I was going to just add Rum Chata to my basic vanilla cupcake recipe, however, I decided to search for an actual Rum Chata cupcake recipe and what do ya know! Found one.

There is only one word for these cupcakes...moist! Yes, I hate that word with a passion, however, it's the only word I can think of when I think of how these tasted. My number one concern when baking cupcakes is being able to keep them moist. The creamy rum does it for these cakes.

The Hot Damn adds to the sweetness...and may have actually been better than the Fireball which is what I was originally going to add to the icing. Fireball...Rum Chata...Cinnamon Toast Crunch cereal...get it? The cinnamon schnapps flavor went well with the Rum Chata in the cakes though and I'm quite happy that I went with that instead. You may ask, "Why does she have Hot Damn lying around??" Well, you can thank Vinnie and Megan for the 15 minis that were part of my secret Santa gift at the Christmas Party...

The best thing about minis...you don't ever feel guilty eating just one. The bite size treats are easy to pop in your mouth in one (or two) bites and they immediately satisfy your sweet tooth.

Random fact of the day...remove your cupcakes from the oven when they are a bit "sunken" in in the center. I read recently that just because the dome top seems to produce the perfect cupcake, doesn't necessarily mean it will be perfect on the inside. It could actually mean that it is over done. I thought about this during my baking session on Sunday and it does indeed make a difference!

Try the recipe out on your free time!

Snicker-Doodle-Di-Day

Another cupcake order for a family friend!

During my last post, I was getting ready to whip up three dozen cupcakes for a family friend Julie. At that point though, she wasn't sure what flavors she wanted to take with her to the party she was going to. I had suggested vanilla bean and the chocolate cupcakes that taste like brownie heaven. Then I felt like that was just WAY too boring. She was writing me back and forth on my Liv's Bakery's Facebook page and so I had taken the proactive stance and said, "You know what? That sounds a bit too boring...I'd like to suggest my snicker doodle cookie cupcakes and the red velvet."

She sure did like that idea!

Two dozen snicker doodle COOKIE cupcakes and one dozen red velvet it was!

When I made the snicker doodle cookie cupcakes in the past, I iced them with a homemade cinnamon whipped cream and they were PHENOMENAL. I am starting to feel like a cupcake is just too sweet sometimes when you have a rich, moist cake and a thick & creamy butter cream icing on top. That is why I went with the light whipped cream. This time, I wanted to try out a new, less-sweet-sounding butter cream to add to the snicker doodle cupcakes for her order.

I got the butter cream recipe from one of my newer cookbooks, "Cupcakes." I've never seen butter cream made like this before!

To make 2 cups of it, you use 3 egg WHITES, 3/4 cup granulated sugar, 1 cup of butter cut into pieces, and a pinch of salt. Then, you add whatever flavoring you'd like (the cookbook tells ya how) so I added a tsp. of my homemade vanilla extract. It was absolutely AMAZING! So light and fluffy and it never hardened up at all. I had a few left over after putting the order together and even a few days later the icing wasn't hardened (like normal butter cream icing does). I'll have to say, even without the vanilla added, this butter cream is so tasty.

I went with my normal red velvet cupcake recipe from www.allrecipes.com which were paired with cream cheese butter cream frosting.

I was a bit disappointed with the red velvet...they did not turn out moist like they normally do! Maybe it was just because they were a few days old once I could try one of the left overs...may be switching up that recipe next time!

I'd recommend...if you are making two dozen cupcakes and you want to try the butter cream out mentioned above, you make 1 1/2 times the recipe. I ran out and had to make half the recipe again to finish icing my cupcakes.

To make the fluffy butter cream using the ingredients above:
1. Combine the egg whites and sugar in a heat proof bowl
2. Place the bowl over a pot of simmering water on the stove (make sure the bowl isn't touching the water). You could also use a double-broiler (I don't have one though)
3. Whisk the mixture for about 2 minutes
4. Remove the egg white sugar mixture from the pot of simmering water, place on a hot pad, and using a hand mixer, blend the mixture until light and fluffy and soft peaks form (about 6-7 minutes)
5. With the two sticks of butter cut up into about 16 pieces, add the pieces 2 at a time to the mixing bowl. Add the salt. Mix until all butter is incorporated and the butter cream is one product (meaning, if it looks like it's separating or is liquidy, keep going!)
6. Add in whatever flavor you desire (I added 1 tsp. of vanilla) and use the butter cream right away

But remember, make 1 1/2 times the recipe if you're icing two dozen regular sized cupcakes :)

The order turned out fantastic and Julie said they were a big hit at the party!

Next up: Mini Rum Chata cupcakes with Fireball butter cream frosting for the Raven's playoff game this weekend! (Must be 21+ to enjoy)

Cheers!


Upcoming Cupcake Order

It is unbelievably slow at work right now so I am going to blog about my next cupcake order coming up this Saturday!

One of my mom's close friends is going to a party on Saturday and wants to take three dozen of my best cupcakes. I thought about this for a little and recommended the vanilla bean cupcakes and the chocolate-brownie-ish cupcakes that I made for a past order. Then I thought that this was a tad boring for an "After New Years Party." I then recommended my red velvet or snicker doodle cupcakes. EVERYONE loves snicker doodles.

Whichever way she goes, I am going to try out the new version of classic butter cream that is featured in one of my cupcake cook books. Instead of using all of that powdered sugar which makes butter cream EXTREMELY sweet, rich, and thick, this recipe uses 3 egg whites, regular sugar, butter, and vanilla. Instead of JUST using a hand mixer/standing mixer, you need to use a double broiler first and then move onto the mixer . This is a very interesting butter cream recipe and I am excited to try it out! I imagine it being a lot lighter and definitely a lot less rich.

The best part about this recipe (and with the traditional butter cream recipe) is that you can add literally ANY flavor to it. I am planning on making a chocolate butter cream and then the plain, vanilla (or maybe a hazelnut...yum!!)

Stay tuned for the final outcome of my next cupcake order!

Cheers!

Bread for the Irishmen!

Current Mood: Sleepy 
Listening to: Eagle-Eye Cherry - Save Tonight (90s Alternative FTW!)

Welcome to January, the month of bread! Or...Bread Month...or possibly known as one of the most challenging months of my baking blog's lifetime. I'm not too experienced in baking bread but it was my sister's idea for January so I went with it!

I used to make zucchini bread ALL THE TIME at my house growing up. It used to be a pain having to cut/chop/food process the zucchini and that was quite possibly my least favorite part of making this bread when I was younger. The recipe made two loafs of moist, delicious breakfast or snack bread. It's a sweet bread so most would disagree with eating this for breakfast; however, in my family, there is never a BAD time for sweets...can you say helllllooooo cavities?!

This is probably the only type of bread I've tackled in my years...well besides scrumptious cinnabuns that I made in the beginning of my baking blog time. I've never had a huge interest in baking bread but now that I think about it, it's pretty simple depending on what type of bread you are making. 

It was Dominic's idea for me to make Irish Soda Bread this past weekend to kick off bread month (he's half Irish). I've never had it before so I thought hey, what the heck! It turns out that traditional soda bread is usually really plain and simply made. After doing some research to find the right recipe, I learned that TRADITIONAL soda bread doesn't have ANY of the following:

"Zest", orange or any other kind, Irish whiskey, honey (substitute for sugar), sugar (see definition of "cake"), eggs (see definition of "cake"), garlic  (not common in English/Irish dishes), shortening , double cream, sour cream, yogurt, chocolate, chiles/jalapenos, or fruit (Only in Christmas/Easter cakes and other special occasions). This info came from http://www.sodabread.info/ which has information on traditional soda bread recipes. 

However, many of the recipes I came across included at least one egg, raisins and in some cases, caraway seeds. I decided to go with one that had one egg and raisins in it after taking MOST of the advise from the soda bread website above. You can find the recipe here. It had good reviews and seemed like more of the traditional recipe. This bread DOESN'T require lots of kneading and it turned out that I didn't have to go out and buy any ingredients for it!

What I did for the buttermilk: I made my own buttermilk because they only had a larger carton in the store. In the past, I've used cream of tartar and skim milk but this time I used white vinegar and 2% milk (I didn't have skim at the time). The recipe calls for 1 3/4 cup buttermilk so I used 1 3/4 tablespoon white vinegar and filled milk up to 1 3/4 in a liquid measuring cup. You let it sit for about 5 minutes and there you have your buttermilk!

Everything else was extremely simple--I used a lightly floured baking sheet to place the round bread loaf on and stuck it in the oven. There were issues with the oven I was using so I had to place it on 350 degrees instead of 425. The bread cooked for closer to an hour this way. Yes, the dough will be sticky and yes, this means it is VERY hard to score the bread. It still cooked through and came out delicious :)

I recommend including the raisins...this adds a little sweetness to the otherwise very plain bread. They say it's best to eat right from the oven; however, you can heat it up in the toaster or oven later on, put some butter on it, and it's just as great.

Enjoy!